Which STM32 Board You Should Choose in 2026
If you are new to STM32, the first problem you will face is not the code. It is choosing the board. There are Nucleo boards, Discovery boards, Eval boards, and then people also talk about custom boards. So which one do you actually need?
In this article, I will break down all these board types in simple words, tell you the price range, and also tell you where to start with the software side – CubeMX, CubeIDE, and CubeProgrammer.
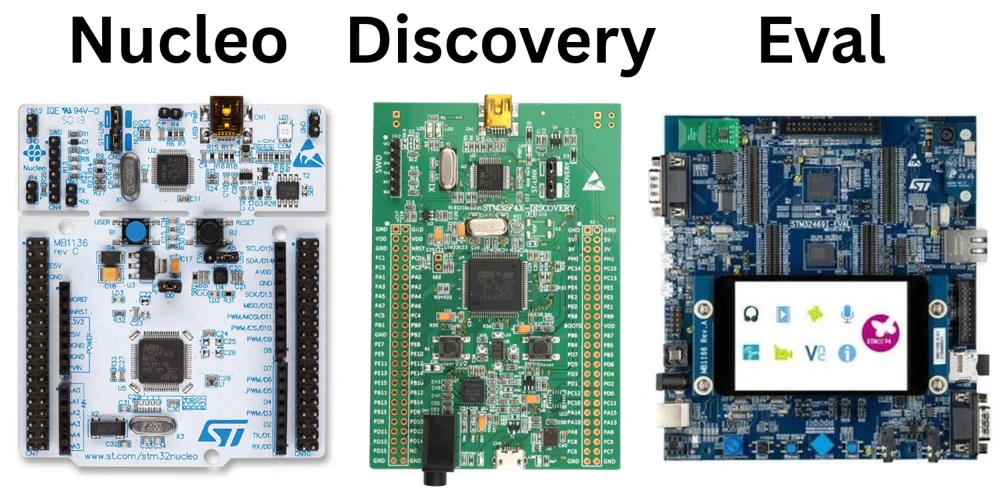
Table of contents
- Which STM32 Board You Should Choose in 2026
- What is STM32 and Why It Is Still Popular in 2026
- Different Types of STM32 Boards Explained
- STM32 Board Price Comparison – Nucleo vs Discovery vs EVAL vs Custom
- Nucleo vs Discovery vs EVAL vs Custom Board – Which One to Pick
- Which STM32 Board Is Best for Beginners
- Which STM32 Board Is Best for Advanced Projects or Prototyping
- Which STM32 Series Should You Pick in 2026
- How to Start with STM32 Development in 2026
- Wrapping up
What is STM32 and Why It Is Still Popular in 2026
STM32 is a family of 32-bit microcontrollers made by STMicroelectronics. It is built on ARM Cortex-M cores, so once you learn one STM32 chip, moving to another one becomes easy.
The reason STM32 is still popular in 2026 is simple — good performance, huge community, low price, and boards for every budget. You can start with a $10 Nucleo board, and the same knowledge will work when you move to a $300 Eval board or your own custom PCB later.
STM32 is not just for hobby projects. It is used a lot in industrial automation, motor control, medical devices, automotive, and consumer electronics. Companies pick STM32 because the same core knowledge works across a huge range of chips – from a small STM32F0 running at a few MHz for a simple sensor, to an STM32H7 running at 480 MHz for heavy signal processing. So a company can start a product on a cheap chip and later move to a bigger one in the same family without redoing everything from scratch.
On the performance side, STM32 covers almost every need. You get:
- Basic Cortex-M0/M0+ chips for simple, low-cost applications.
- Cortex-M3/M4 chips with hardware floating point, good for general purpose work and motor control.
- Cortex-M7 chips for heavy processing like DSP, graphics, and high-speed control loops.
On top of this, STM32 chips come with a lot of built-in peripherals – CAN, USB, Ethernet, multiple UARTs/SPIs/I2Cs, ADCs, DACs, timers with advanced features, and even chips with wireless (BLE, Sub-GHz) built in. So depending on your project, you can usually find one STM32 chip that fits your need without adding a lot of external hardware.
Different Types of STM32 Boards Explained
Before comparing different STM32 boards, let’s understand what each board actually is.
Nucleo Boards
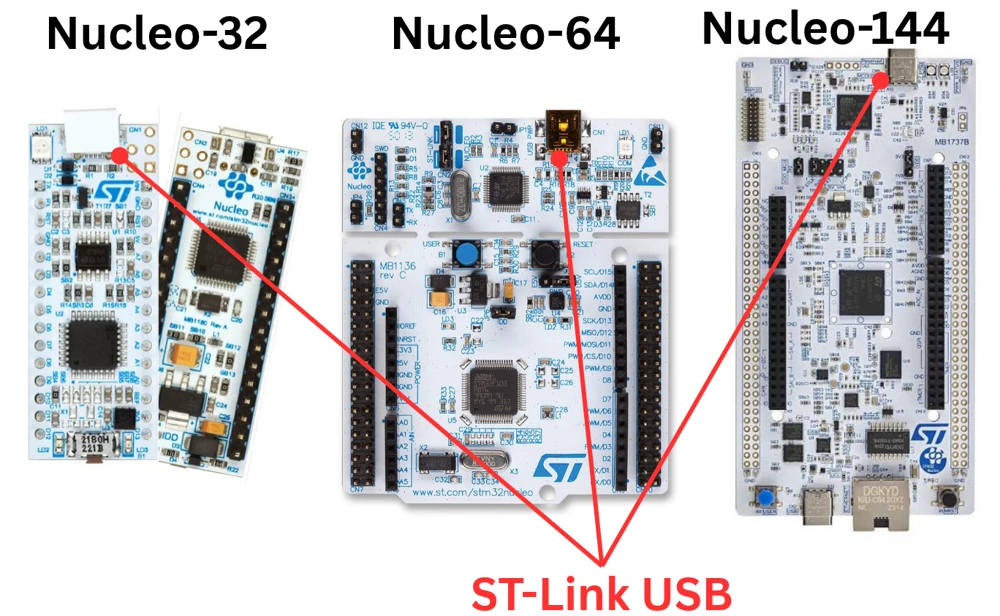
Nucleo boards are the official low-cost development boards from ST. They come in three sizes – Nucleo-32, Nucleo-64, and Nucleo-144. They have a built-in ST-Link debugger, so you don’t need to buy a separate programmer. They also have Arduino-compatible headers, which means you can use Arduino shields directly on them.
Discovery Boards
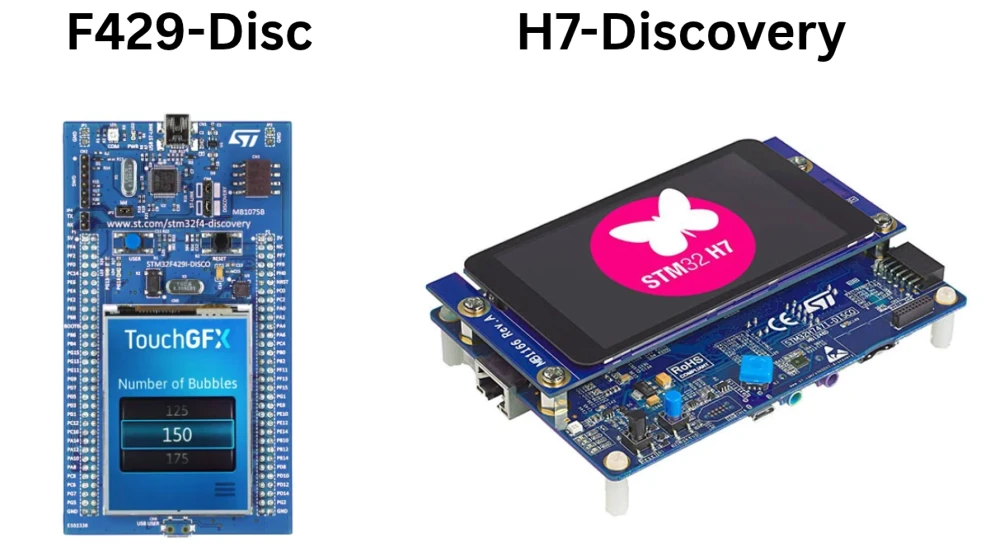
Discovery boards are made to show off what a particular STM32 chip can do. So along with the MCU, they come loaded with extra hardware, such as accelerometer, microphone, audio codec, touch screen, and so on. This makes them good for testing sensors and multimedia features without buying anything extra.
Evaluation (EVAL) Boards
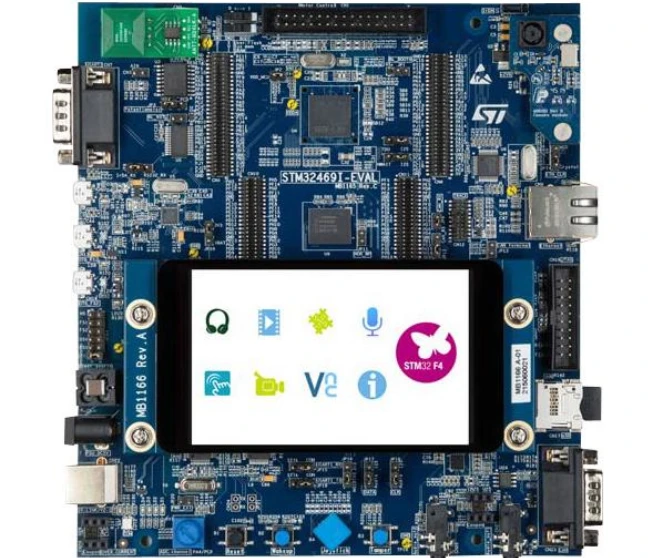
Eval boards are the biggest and most complete boards. They expose every single pin and feature of the microcontroller. Companies use these boards to test a chip fully before designing their own product around it. They are costlier and mostly used for serious evaluation work, not for daily learning.
Custom Boards
A custom board is a PCB you design yourself (or get designed) with only the components you need. No extra sensors, no extra connectors – just what your project needs. This is what companies use once a product goes into production, because it becomes cheaper per unit and fits into the actual product enclosure.
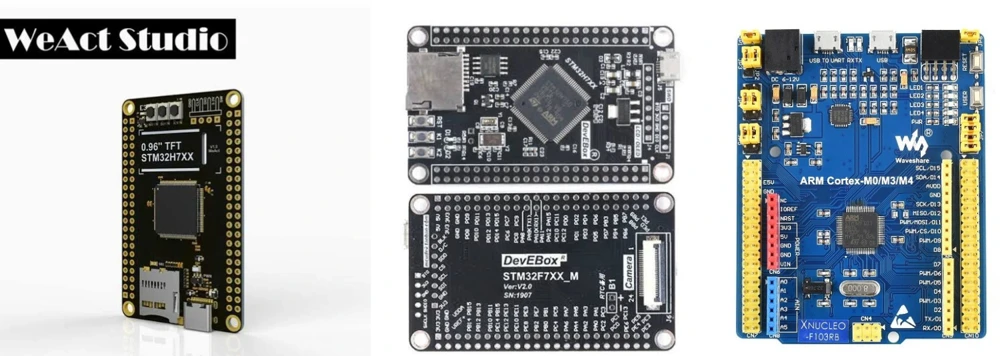
Apart from ST’s own boards, there are some companies which design and sell custom boards specifically for STM32 chips. The most famous ones are WeAct Studio, WaveShare, and MCUdev. These boards are not official ST boards, but they let you test high-end STM32 chips at a much lower cost.
STM32 Board Price Comparison – Nucleo vs Discovery vs EVAL vs Custom
Here is a rough price range so you get an idea (prices in USD, single unit, approximate):
| Board Type | Price Range (USD) | Notes |
|---|---|---|
| Nucleo | $10 – $25 | Most Nucleo-64 boards (F1, F4, G0, L4) fall in this range. Nucleo-144 boards (H7, F7 series) go up to $30–$40. |
| Discovery | $10 – $40 | Basic Discovery boards (F0, F3) are cheap. F4/F7 Discovery boards with audio/touch go up to $30–$40. H7 Discovery boards are the costliest in this category, often $50–$90+, because of the extra RAM, camera interface, and display hardware onboard. |
| Eval | $80 – $300+ | Full-featured boards meant for serious testing, price depends heavily on the chip and add-on hardware. |
| Custom (WeAct/generic minimal boards) | $3 – $15 | Boards like the Blue Pill (F103), Black Pill (F401/F411), and even WeAct’s H743 boards fall here — bare minimum board with just the MCU, crystal, regulator, and USB. Cheapest way to try a high-end chip like the H743 without paying Nucleo-144 or Discovery prices. |
Price is not just about the board itself, it also depends on what comes with it. A Nucleo board looks cheap on paper, but it already includes a built-in ST-Link debugger, which itself costs $15–$20 if bought separately. So you are actually getting a debugger + dev board combo for the price of one.
Discovery boards can look expensive for what seems like “just a dev board,” but the price includes the onboard sensors, audio codec, or display. This hardware would otherwise cost you extra money and extra wiring if bought separately.
Eval boards are priced for a different audience altogether. These are not meant for students or hobbyists, they are meant for engineers in a company who need every single pin and feature broken out for testing, before finalizing a chip for their product. You are paying for completeness, not for saving money.
Custom minimal boards (Blue Pill, Black Pill, WeAct boards) flip this logic. They strip away the debugger and extra hardware to hit the lowest possible price. This makes them attractive if you already own an ST-Link and just want to try out a chip like the H743 without spending Nucleo-144 or Discovery money on it.
So when comparing prices, don’t just look at the number – look at what is already included in that price, because that changes what you are actually paying for.
Nucleo vs Discovery vs EVAL vs Custom Board – Which One to Pick
Picking between these four is not about which one is “best”. It is about what stage your project is in.
If you are still learning STM32 basics (GPIO, UART, timers, interrupts) a Nucleo board is enough. You don’t need any extra sensors or hardware at this stage, and the built-in debugger means you can start coding within minutes of unboxing it.
Once you move past the basics and want to work with something specific like audio, touch screens, or motion sensing, a Discovery board saves you a lot of time, since the hardware is already included on the board. You skip the wiring and jump straight into writing code for that feature.
If you are working in a company and need to test out a new STM32 chip before deciding whether to use it in a product, an Eval board is the right choice. It gives you access to every pin and feature of the chip, so nothing is hidden or unavailable while you are evaluating it.
And if your project is finalized and you are moving to production, that’s when a custom board makes sense, either a minimal board like a WeAct/Blue Pill style design for personal projects, or a fully custom PCB designed around your product for a company.
| Situation | Best Choice |
|---|---|
| You are learning STM32 from scratch | Nucleo / Custom + ST-Link |
| You want to test sensors, audio, or touch screen | Discovery |
| You are evaluating a chip before mass production | Eval |
| You want to try a high-end chip cheaply, own hardware/hobby project | Custom (WeAct/minimal) |
| You are building a final product in bulk quantity | Custom (own PCB) |
Which STM32 Board Is Best for Beginners
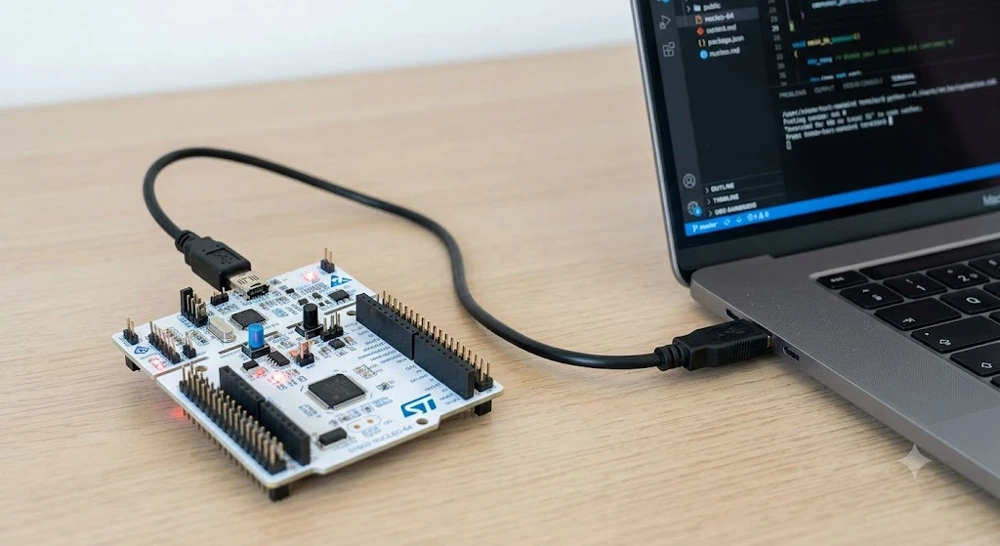
If you are just starting out, go with a Nucleo board. Here is why:
- It has a built-in ST-Link, so no extra programmer is needed.
- It is cheap, so if something goes wrong, you don’t lose much money.
- It has Arduino headers, so a lot of ready-made shields and sensors work directly.
- The community around Nucleo boards is huge, so most tutorials (including mine) are based on Nucleo.
A good starting point in 2026 is something like the Nucleo-F401RE or Nucleo-F411RE. Both are cheap, well documented, and powerful enough for almost all beginner and intermediate projects.
If you want a bit more headroom without spending too much extra, the Nucleo-F446RE is also a great pick. It runs at 180 MHz, has more timers, and includes extra peripherals like SAI and additional ADCs compared to the F401/F411. This makes it capable of handling motor control projects, audio applications, and other slightly heavier work, while still staying in the same beginner-friendly Nucleo-64 form factor and price range.
So for pure basics, F401/F411 is more than enough. But if you already know you’ll be doing something like motor control or a project that needs more computing power down the line, starting directly with an F446 saves you from switching boards later.
Which STM32 Board Is Best for Advanced Projects or Prototyping
Once you are done with the basics and want to try things like audio processing, touch screens, or motion sensing, move to a Discovery board. Since the sensors are already onboard, you save time and do not need to wire up anything extra.
For example, if you want to work with:
- Audio and DSP — an F4 or F7 series Discovery board with an audio codec is a good pick.
- Touch and display — F429 Discovery or similar boards with an onboard LCD.
- Motion sensing — Discovery boards with onboard accelerometer/gyroscope.
If your project needs more raw power for heavy image processing, complex control loops, or running multiple tasks at high speed, go for an H7 series Discovery board. These come with a Cortex-M7 core running at up to 480 MHz, along with extra RAM, camera interface support (on some models), and better memory bandwidth, which makes them suitable for things like real-time graphics or camera-based projects.
Discovery boards are also a good fit when you are still deciding what final chip to use for your product. Since you can test multiple features (audio, display, sensors) on the same board, you get a feel for how the peripherals behave in real conditions before committing to a design.
One thing to keep in mind, Discovery boards are meant for prototyping and evaluation, not for direct use in a final product. Once your prototype works the way you want, you would still move to a custom board for the actual product, keeping only the components you actually used.
Which STM32 Series Should You Pick in 2026
STM32 boards use different chip series inside them, and this matters as much as the board type.
STM32F0 / F1 Series
These are the basic, low-cost chips. Good for simple learning projects like blinking LEDs, UART, basic timers. Cheapest way to start. You’ll find these in Nucleo boards (like Nucleo-F103RB) priced around $10–$13, and Discovery boards (STM32F0DISCOVERY) around $10–$15. Also available as bare minimum boards like the Blue Pill (F103) for as low as $3–$5.
STM32F4 Series
This is the most popular series and a good balance of performance and price. Most tutorials online (including on this blog) are based on F4 chips like the F401 and F407. If you are not sure which series to pick, go with F4. Nucleo boards (F401RE, F411RE, F446RE) are priced around $12–$18, while Discovery boards (F407G-DISC1, F429I-DISC1) with onboard sensors/display range from $15–$40. You can also find Black Pill boards (F401/F411) for $8–$12 if you want something cheaper and more compact.
STM32G0 / G4 Series
These are newer and often cheaper than F4 for similar performance. Good option in 2026 if you want a modern, cost-effective chip. Nucleo boards for G0 (like Nucleo-G071RB) and G4 (Nucleo-G474RE) are available in the $10–$15 range. Discovery/Eval options for these series are limited compared to F4, so Nucleo is usually the easiest way to get started here.
STM32H7 Series
This is the high-performance series, running up to 480 MHz with a Cortex-M7 core. Use this only if your project genuinely needs the extra speed, for example, things like heavy DSP, motor control, or large graphics. Nucleo-144 boards (H743ZI2, H723ZG) cost around $30–$40, and Discovery boards (H747I-DISCO, H7B3I-DK) with extra RAM and display support can go up to $50–$90. If you just want to try the chip cheaply, WeAct’s H743 minimal boards are available for around $10–$15, though you’ll need a separate ST-Link to program them.
STM32L Series
Built for low-power projects. If your product runs on a battery and needs to sleep most of the time, go with an L-series chip. Nucleo boards (L053R8, L476RG) are priced around $10–$15, and Discovery boards (like the STM32L476G-DISCO) with power measurement features are usually $15–$25.
How to Start with STM32 Development in 2026
Once you have picked a board, here is the software order you should follow.
STM32CubeMX – Where You Configure the Peripherals
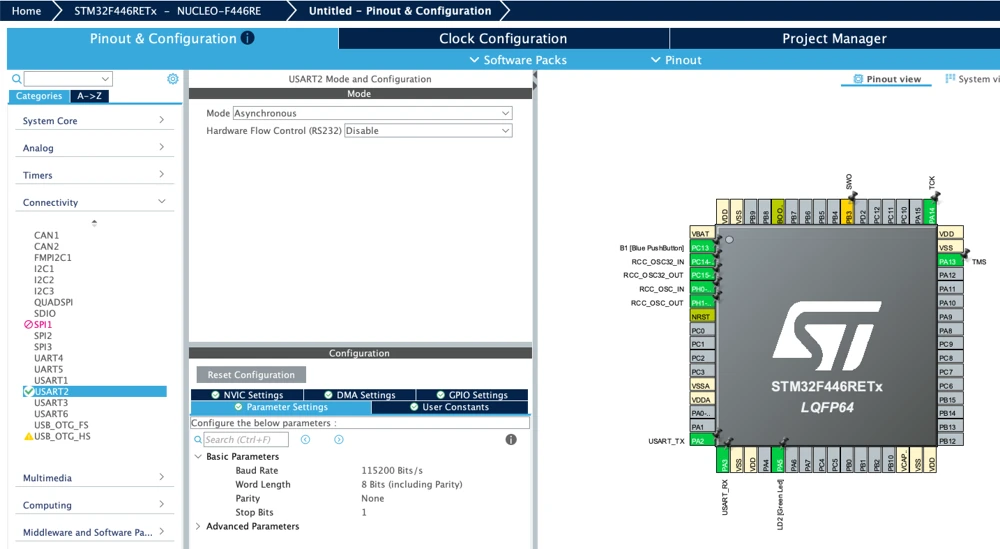
CubeMX is where you set up your pins, clocks, and peripherals using a simple graphical interface. You don’t write any code here, you just click on the pins you want to use, configure things like UART, SPI, timers, etc., and then generate the code.
STM32CubeIDE – Where You Write and Debug Code
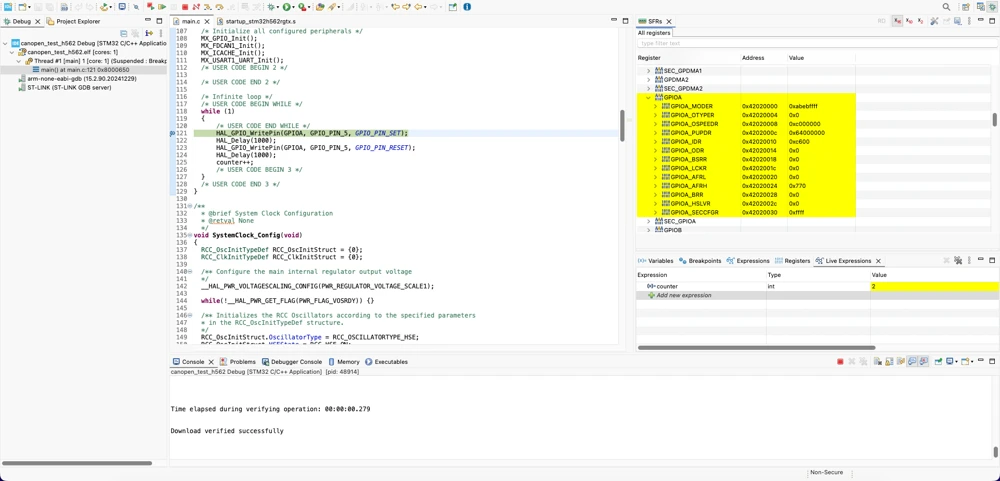
CubeIDE is the official IDE from ST. Earlier versions used to have CubeMX built directly into it, but that is no longer the case. Now you configure your pins and peripherals in CubeMX separately and then import that project into CubeIDE. Here you write your application logic and debug it using breakpoints, live variable watch, etc.
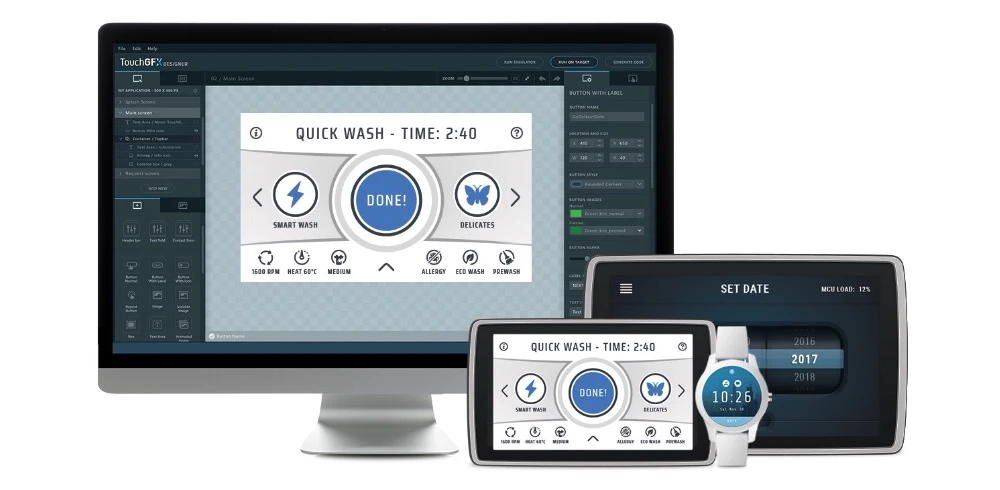
TouchGFX – For Designing Graphics and UI
If your project involves a display, TouchGFX is ST’s tool for designing the UI. You can drag and drop screens, buttons, animations, and graphs, and it generates the display code for you, which you then bring into your CubeIDE project. One thing to keep in mind that the TouchGFX Designer currently runs on Windows only, so if you are on Linux or Mac, you will need a Windows machine (or a VM) just for the UI design part.
STM32CubeProgrammer – Where You Flash the Code
Once your code is built, CubeProgrammer is the tool used to flash the compiled binary onto your STM32 chip. STM32CubeIDE can also flash your code directly, but CubeProgrammer is more powerful and is used separately when you need to:
- Read or write memory at a specific address, not just flash the whole program.
- Flash a chip in DFU mode (using the USB bootloader, without an ST-Link). It is useful for boards like Blue Pill or Black Pill that don’t have a debugger onboard.
- Unlock or protect the chip’s flash memory (read-out protection).
- Update the firmware of your ST-Link itself.
So while CubeIDE is enough for daily flashing during development, CubeProgrammer is the tool to reach for when you need more control over the chip’s memory, or when you don’t have an ST-Link and want to flash over USB using DFU mode.
Wrapping up
If you are just starting out, get a Nucleo board. It’s cheap, has a built-in debugger, and most tutorials are based on it. Once you want to explore sensors, audio, or displays, move to a Discovery board. Eval boards are for serious chip evaluation, not for daily learning. And custom boards make sense only once your product is ready for production.
Start with CubeMX to configure your pins, move to CubeIDE to write your code, and use CubeProgrammer to flash it onto your board. That’s the complete path from picking a board to running your first project.
If you want to actually follow this path step by step, check out my next article, Your First Project with STM32, where I walk through the entire process – from configuring pins in CubeMX to flashing and running your first program on a real board.
What to Read Next
Coming Soon…