STM32 Naming Convention Explained
If you have spent any time browsing STMicroelectronics’ website or looking through a distributor’s catalogue, you have probably noticed that STM32 part numbers are long and not very friendly. Something like STM32F407VGT6 does not tell you much unless you already know what you are looking at. Once you understand how the naming convention works, that same string of characters becomes a compact summary of the chip: its family, its performance class, how many pins it has, how much memory it carries, and more.
This guide walks through the STM32 naming convention piece by piece. By the end, you should be able to look at almost any STM32 part number and understand what it is telling you, without needing to open the datasheet first. We will also work through several real part numbers at the end.
Table of contents
- STM32 Naming Convention Explained
- Why STM32 Part Numbers Look Complicated
- Understanding the STM32 Family and Series
- Understanding STM32 Device Variants
- Understanding STM32 Pin Count
- Understanding STM32 Flash and Memory Options
- Understanding STM32 Package Types
- STM32 Temperature and Qualification Codes
- Real STM32 Part Number Examples
- How to Verify an STM32 Part Number in the Datasheet
- Wrapping Up
Why STM32 Part Numbers Look Complicated
The main reason STM32 part numbers seem complicated is that they carry a lot of information in a short space. A single part number has the information about the manufacturer, the product platform, the family, the specific series within that family, the number of pins, the amount of flash memory, the package type, and sometimes the temperature range and other qualification details. That is a lot of information to pack into twelve or so characters, so STMicroelectronics uses a fixed structure where each position in the string has a defined meaning.
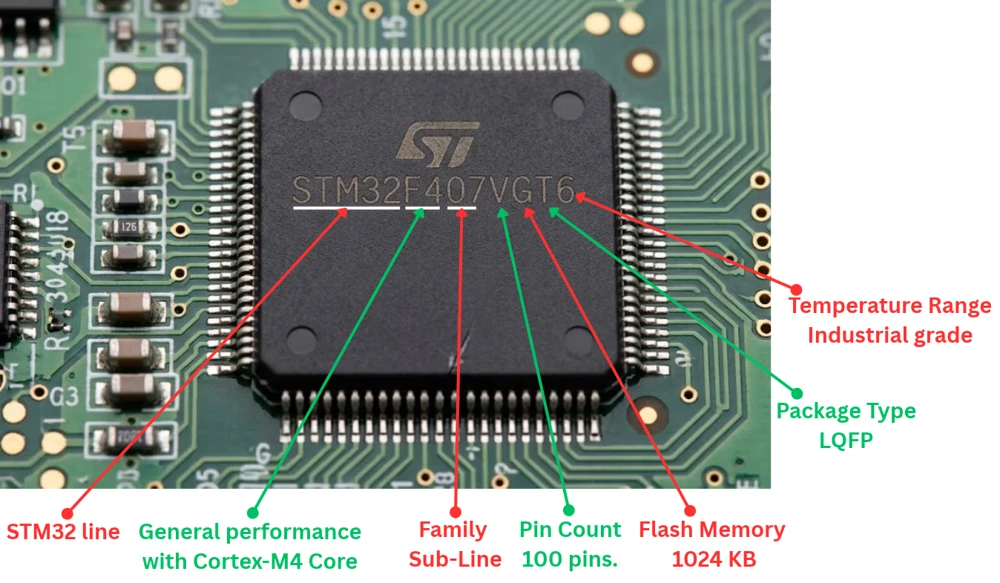
This is actually good news for anyone learning to read these numbers. Because the structure is fixed, you do not need to memorise every part number STMicroelectronics has ever released. You only need to learn what each position in the string represents, and then you can work out the meaning of almost any part number you come across, including ones you have never seen before.
It also helps to know that not every STM32 family uses exactly the same layout for every position. The general pattern holds across the range, but a few families add extra characters for things like security features or wireless capability. I will point these out as well, and show you where to confirm the details for any specific chip.
Understanding the STM32 Family and Series
Every STM32 part number begins with the letters STM32, which simply tells you that this is a member of STMicroelectronics’ 32-bit microcontroller platform, built around Arm Cortex-M processor cores. After that comes the family letter and the series number.
The family letter tells you which broad product line the chip belongs to, and each family is built around a particular design goal. Here are the main ones you will come across:
- F – Foundation and mainstream families, covering general purpose microcontrollers such as F0, F1, F3, F4, and F7. These are the chips most people start with, and they cover a wide range of performance levels.
- L – Low power families, such as L0, L1, L4, L5, and L family later. These are designed for battery powered applications where reducing current draw matters more than raw processing speed.
- H – High performance families, such as H7. These target applications that need the fastest clock speeds and the largest memories in the STM32 range.
- G – A newer mainstream family, such as G0 and G4, designed to replace and extend some of the older F-series options with updated peripherals.
- W – Wireless families, built around Bluetooth Low Energy, Zigbee, or other radio protocols.
- U – Ultra-low-power families with USB support built in as a defining feature.
- C and MP – Less commonly discussed families, covering wireless connectivity for specific protocols and, in the case of MP, microprocessor products that sit above the microcontroller range.
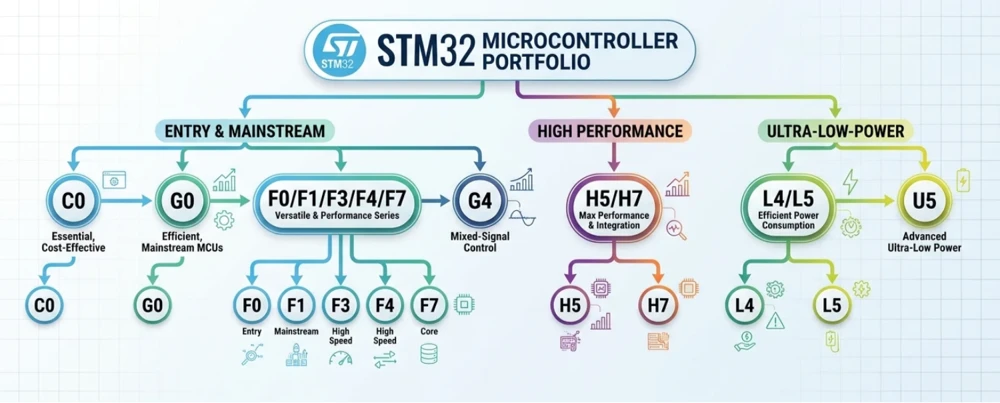
After the family letter comes a number, which identifies the specific series within that family. For example, within the F4 family you will see series such as 401, 407, 411, and 446. Within the L4 family you will see series such as 432, 476, and 496. This series number is where a lot of the real detail lives, because two chips in the same family but different series can have very different peripheral sets, memory sizes, and performance levels. A higher series number does not always mean a newer or faster chip. It is best to think of the series number as an identifier for a specific product line rather than a simple ranking.
This is also the point where it helps to check STMicroelectronics’ own product selector or datasheet. Because the exact meaning of each series number is defined by the manufacturer and is not something you can reliably guess from the number alone.
Understanding STM32 Device Variants
Within a single series, you will often find several device variants that share the same general design but differ in smaller ways. These variants might have different amounts of RAM, different sets of communication peripherals, or minor differences in analogue features such as the number of ADC channels available.
A good way to think about this is that the family and series tell you the general category of chip, while the variant tells you exactly which member of that family you are holding. For example, within the STM32F103 series, you will find variants sometimes grouped informally as “Low-density,” “Medium-density,” and “High-density,” depending on how much flash memory and RAM they carry, along with the peripheral set that comes with each tier.
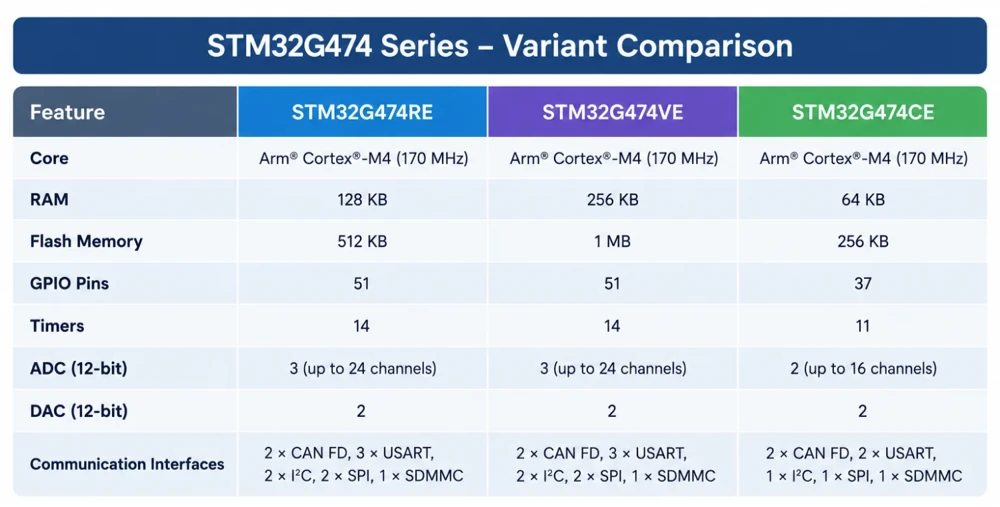
Device variants matter a lot when you are choosing a chip for a new design, or when you are trying to find a replacement for a part that has gone out of stock. Two chips can look almost identical in their part numbers and still differ in ways that matter for your project, such as having one fewer timer or a smaller amount of available RAM. This is why it is worth reading the datasheet’s feature comparison table rather than assuming that similar part numbers mean identical chips.
Understanding STM32 Pin Count
After the family and series numbers, STM32 part numbers include a letter that tells you the pin count of the package. This is one of the more consistent parts of the naming convention across different families. Some of the most common pin count letters are:
- F – 20 pins
- G – 28 pins
- K – 32 pins
- T – 36 pins
- C – 48 pins
- R – 64 pins
- V – 100 pins
- Z – 144 pins
- I – 176 pins
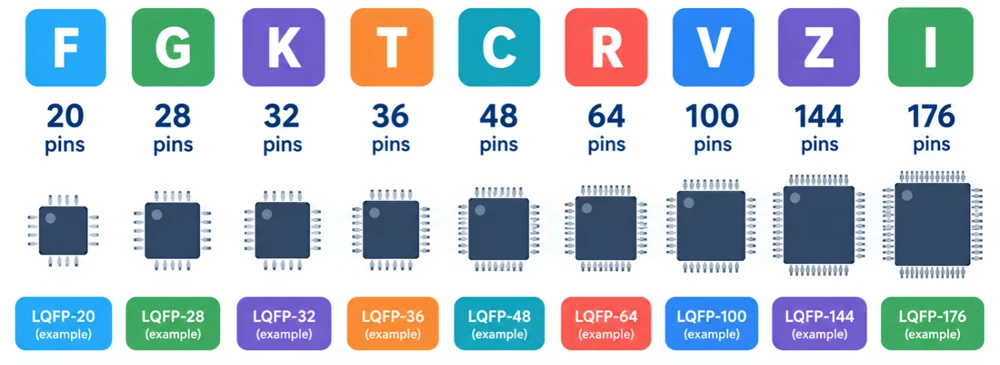
Pin count has a direct and practical effect on your hardware design. More pins generally mean more GPIO lines, more communication interfaces you can use at the same time, and more flexibility when connecting sensors, displays, or other peripherals. It also means a larger physical footprint on your board, since more pins require more space around the edge of the package. When you are choosing between two variants in the same series, the pin count letter is usually one of the first things worth checking, because it tells you upfront how much room you will have to work with before you even open the datasheet.
Understanding STM32 Flash and Memory Options
The next part of an STM32 part number tells you how much flash memory the chip carries. This is usually represented by a single letter, and the exact capacity depends on the family, but the general pattern across most STM32 chips looks like this:
- 4 – 16 KB
- 6 – 32 KB
- 8 – 64 KB
- B – 128 KB
- C – 256 KB
- D – 384 KB
- E – 512 KB
- F – 768 KB
- G – 1 MB
- I – 2 MB
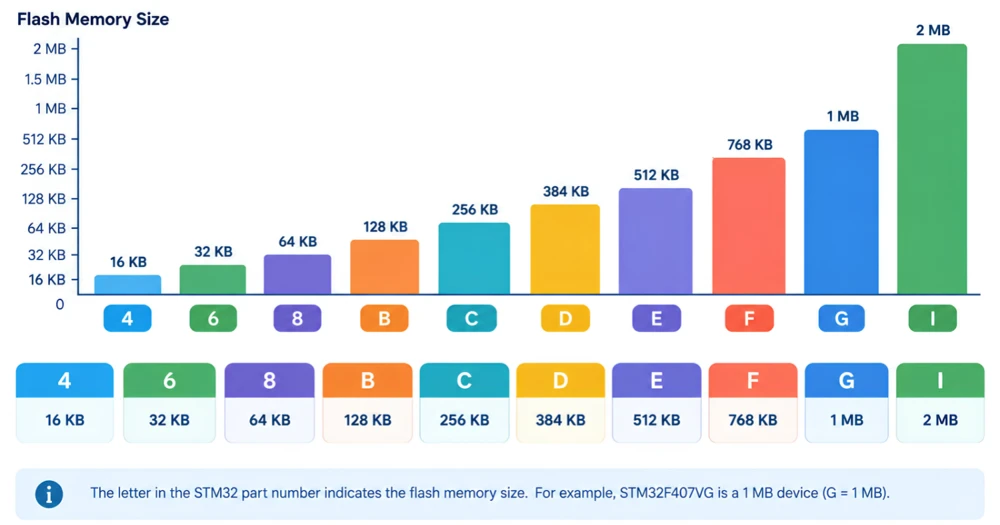
Flash memory is where your compiled program lives, so this letter has a direct effect on how large and how complex a program you can fit inside the chip. A simple project that blinks an LED and reads a couple of sensors might comfortably fit in 32 KB or 64 KB of flash. A more complex project involving a graphical display, several communication protocols, and a real-time operating system will need considerably more room, sometimes reaching into the megabyte range.
It is worth noting that flash size does not tell you about RAM directly. RAM capacity is usually documented separately in the datasheet’s feature table, rather than being encoded directly into this part of the part number. This is one of the reasons to open the actual datasheet, rather than relying only on the part number.
Understanding STM32 Package Types
Following the Flash size letter, most STM32 part numbers include another letter that identifies the package type itself, meaning the physical form of the chip. This letter is separate from the pin count letter, even though the two often sit close together in the part number. Common package codes include:
- T – LQFP (Low-profile Quad Flat Package), a flat package with pins along all four edges
- H – BGA (Ball Grid Array), which uses a grid of solder balls on the underside instead of visible pins
- U – VFQFPN or UFQFPN (Very/Ultra Thin Fine-Pitch Quad Flat No-Lead), a compact package with no visible leads
- Y – WLCSP (Wafer Level Chip Scale Package), an extremely small format used where board space is very tight
- P – TSSOP (Thin Shrink Small Outline Package), used on some smaller pin-count devices
- I – UFBGA (Ultra Fine-pitch BGA), a smaller-pitch BGA variant seen on some newer, higher pin-count parts
These codes are fairly consistent across the STM32 range, but not every family uses every letter. Older chips, such as those in the F1 series, tend to stick to LQFP and BGA, while WLCSP and UFBGA appear more often on newer or space-constrained parts. As always, the datasheet’s ordering information table is the final word on which package codes apply to a specific chip.
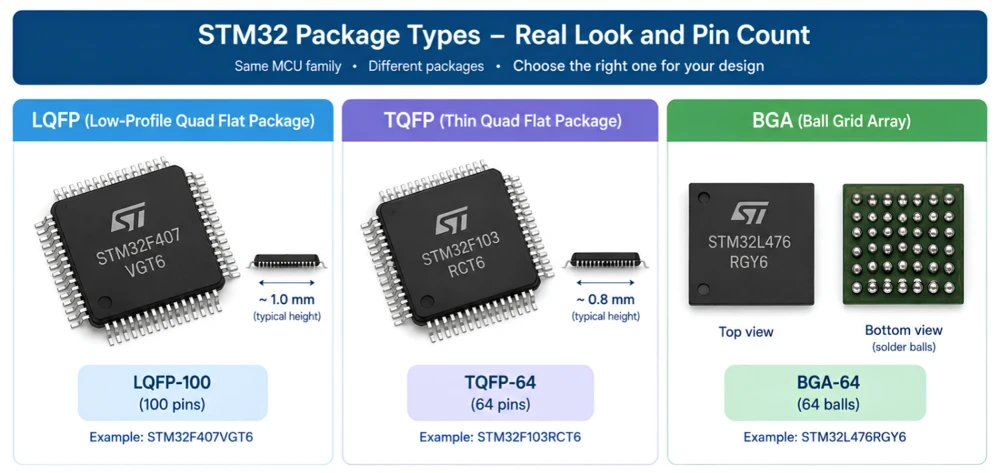
Pin count and package matter enormously for hardware design, because they determine how many GPIO pins are physically available to you, how much board space the chip will need, and whether your assembly process can even handle the package type. A chip with more pins generally gives you more flexibility for connecting peripherals, sensors, and communication interfaces, but it also takes up more board space and may cost more.
STM32 Temperature and Qualification Codes
Near the end of most STM32 part numbers, you will find a number that indicates the operating temperature range the chip has been qualified for. This tells you the environmental conditions the manufacturer guarantees the chip will work correctly within. It matters a lot if your product will be used outdoors, in a vehicle, or in an industrial setting rather than a climate-controlled office or home.
Common temperature range codes include:
- 6 – Industrial range, typically -40°C to 85°C
- 7 – Industrial range, typically -40°C to 105°C
- 3 – Commercial range, typically 0°C to 70°C
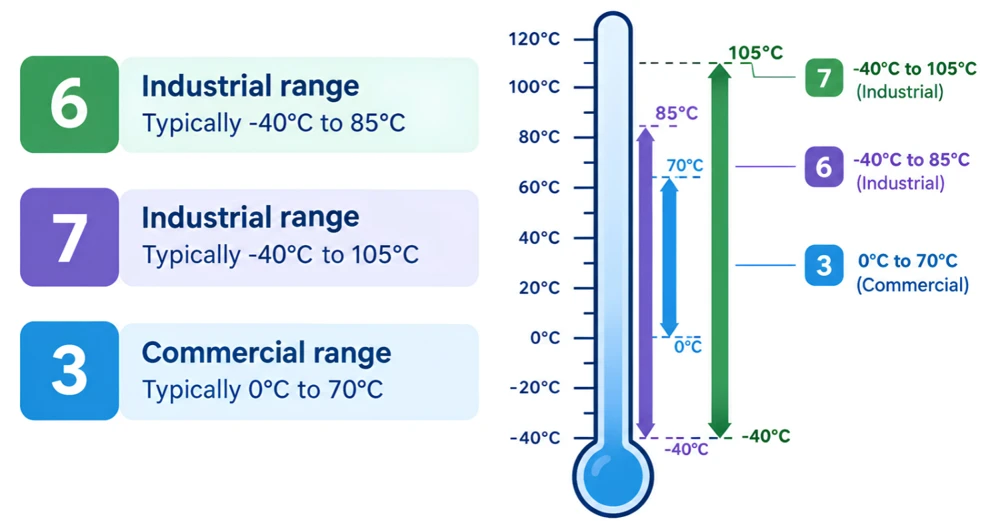
Beyond temperature, some STM32 part numbers include additional suffixes that indicate other qualification details, such as automotive grade certification for chips intended for use inside vehicles, or specific packaging instructions such as tape and reel delivery for automated assembly lines. These extra characters usually appear after the main part number, sometimes separated by a hyphen or shown as a trailing letter code, and their meaning is always confirmed in the ordering information section of the datasheet.
Real STM32 Part Number Examples
Now that we have gone through each section of the naming convention, let us put it all together and decode a few real STM32 part numbers.
STM32F103C8T6
- STM32 – ST’s 32-bit microcontroller platform
- F1 – Mainstream family
- 03 – Performance line within the F1 family
- C – 48-pin package
- 8 – 64 KB of flash memory
- T – LQFP package type
- 6 – Industrial temperature range, -40°C to 85°C
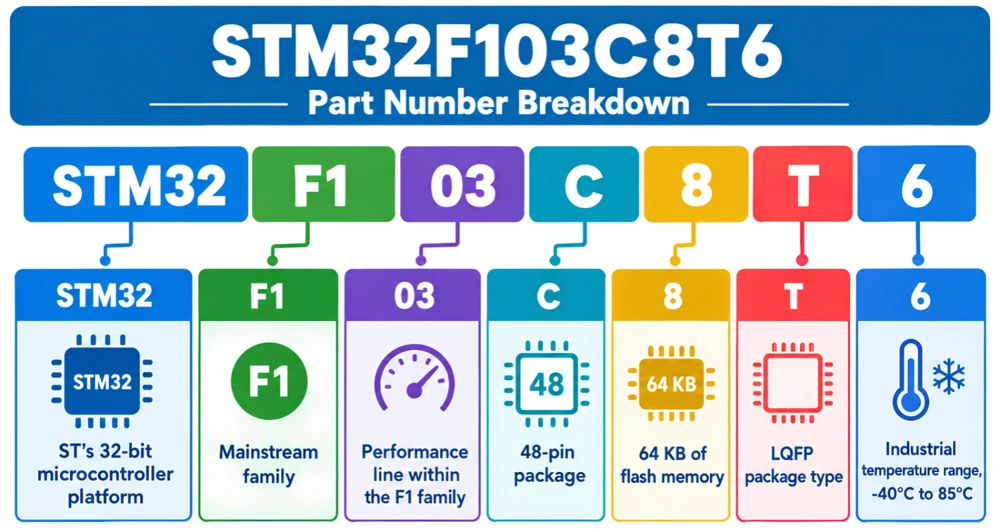
This is the chip found on the well known “Blue Pill” development board, and it is a good example of an entry level, general purpose STM32.
STM32F429ZIH6
- STM32 – ST’s 32-bit microcontroller platform
- F4 – Mainstream, higher performance family
- 29 – A series within F4
- Z – 144-pin package
- I – 2 MB of flash memory
- H – BGA package, using a grid of solder balls instead of visible pins
- 6 – Industrial temperature range, -40°C to 85°C
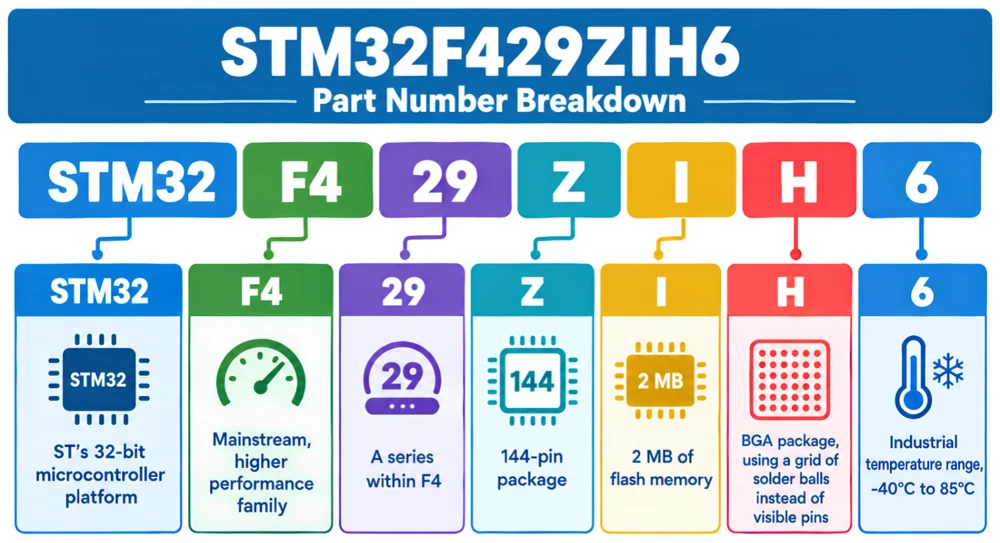
This example shows that higher pin count and larger flash do not always come paired with an LQFP package. Many higher pin count STM32 chips are offered in BGA as well, particularly when board space is tight and a smaller footprint matters more than easy hand soldering.
STM32L476RGT6
- STM32 – ST’s 32-bit microcontroller platform
- L4 – Low power family
- 76 – A series within L4 designed for a balance of low power consumption and reasonable performance
- R – 64-pin package
- G – 1 MB of flash memory
- T – LQFP package type
- 6 – Industrial temperature range, -40°C to 85°C
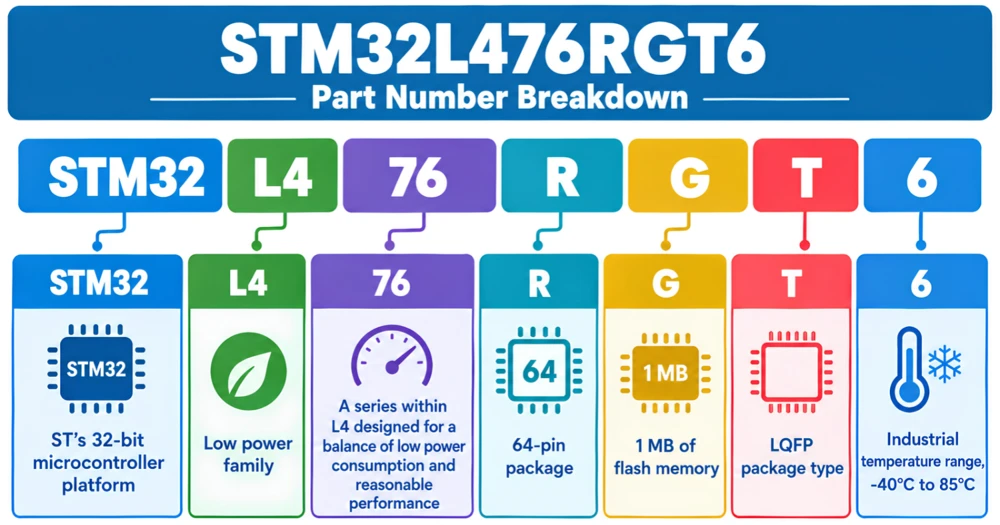
This chip is commonly used in battery powered designs where extending operating time is a priority.
STM32H750VBT7
- STM32 – ST’s 32-bit microcontroller platform
- H7 – High performance family
- 50 – A series within H7
- V – 100-pin package
- B – 128 KB of flash memory
- T – LQFP package type
- 7 – Industrial temperature range, but the wider band, -40°C to 105°C
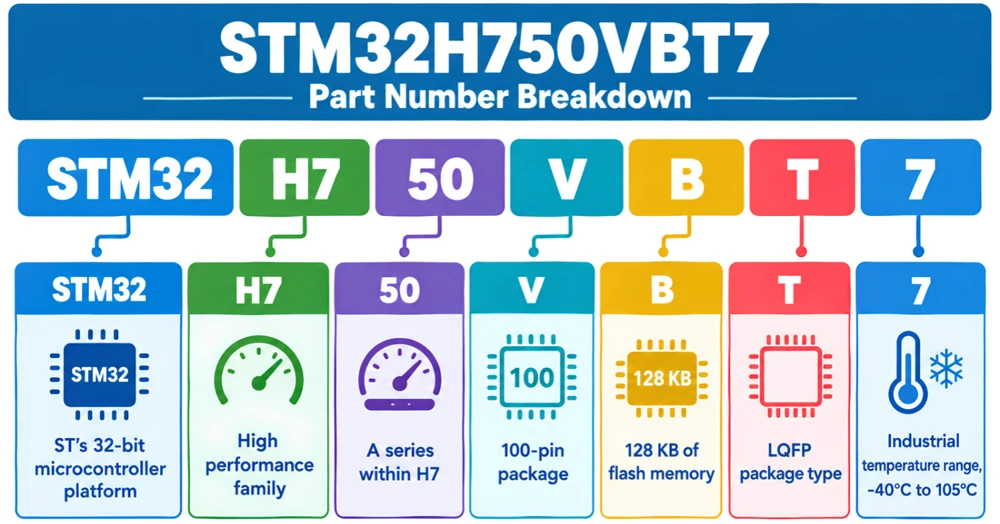
This example is worth pausing on because it looks similar to the earlier H7 example in family and package type, but the final digit is different. A 7 instead of a 6 means this chip is qualified for a hotter operating environment, which matters if the product will sit somewhere without much airflow or climate control.
How to Verify an STM32 Part Number in the Datasheet
Reading a part number by eye is a useful skill, but it should not replace checking the actual datasheet before you commit to a chip for a real project. STMicroelectronics publishes an “Ordering Information” section near the end of every STM32 datasheet, and this section shows the exact structure of the part number for that specific family, along with a table explaining every code used in it.
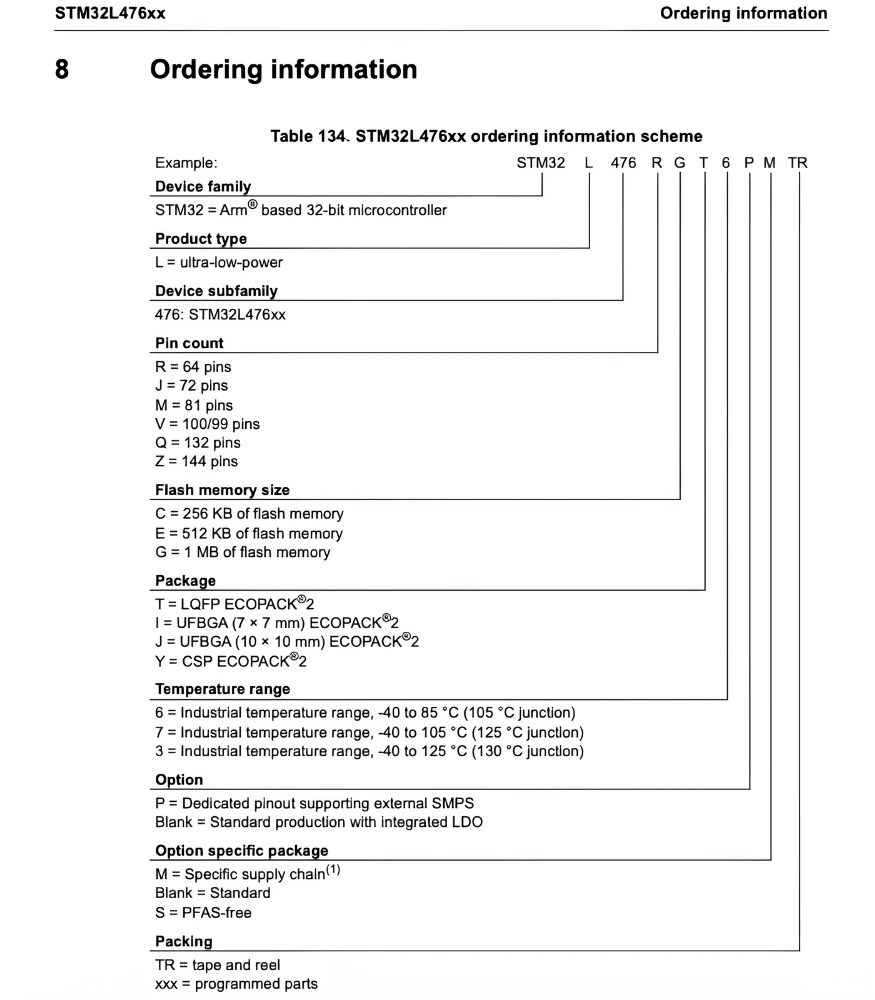
To verify a part number, start by downloading the datasheet for the family you are interested in from STMicroelectronics’ website. Search within the document for “ordering information,” and you should find a diagram similar to the ones we have built in this guide. Compare each character of your part number against the table, one position at a time, rather than trying to match the whole string at once. This step by step approach avoids mistakes, especially in families that use a slightly different structure from the general pattern.
It is also worth checking the datasheet whenever you are sourcing a replacement part or comparing chips from different distributors, since listings do not always spell out every detail of the part number in the product description. A quick check against the datasheet will confirm exactly what you are ordering, including its memory size, package, and temperature rating, before it arrives on your bench.
Wrapping Up
STM32 part numbers can look intimidating the first time you see one, but they are really just a compact, structured way of describing a chip’s most important characteristics. Once you know how to read the family, series, pin count, flash size, package, and temperature codes, a part number stops being a wall of letters and numbers and starts being genuinely useful information.
The best way to build this skill further is practice. The next time you come across an STM32 part number, whether on a development board, in a datasheet, or in a distributor’s catalogue, take a moment to decode it yourself before checking the manufacturer’s documentation. Over time, this becomes second nature, and it will make choosing the right chip for your next project a much faster and more confident process.