STM32 Nucleo vs Discovery vs Custom Boards
If you have started reading about STM32 microcontrollers and gone looking for a board to actually try one out, you have probably run into the same wall most beginners run into. ST does not sell just one development board. It sells Nucleo boards, Discovery boards, Evaluation boards, and on top of that, dozens of third-party boards from other manufacturers all use the same STM32 chips.
For someone buying their first board, this can feel like an unnecessary complication. You just want something you can plug into a laptop, load some code onto, and start learning. But once you understand what each board type is actually built for, the choice becomes a lot easier, and you stop worrying about picking the “wrong” one.
In this article, I will explain what a development board actually is, walk through Nucleo, Discovery, Evaluation boards, and third-party options one by one. I will also explain what ST-LINK and SWD mean, since you will see these terms everywhere. I will also point out the important components on a Nucleo board, since that is the board most beginners end up starting with.
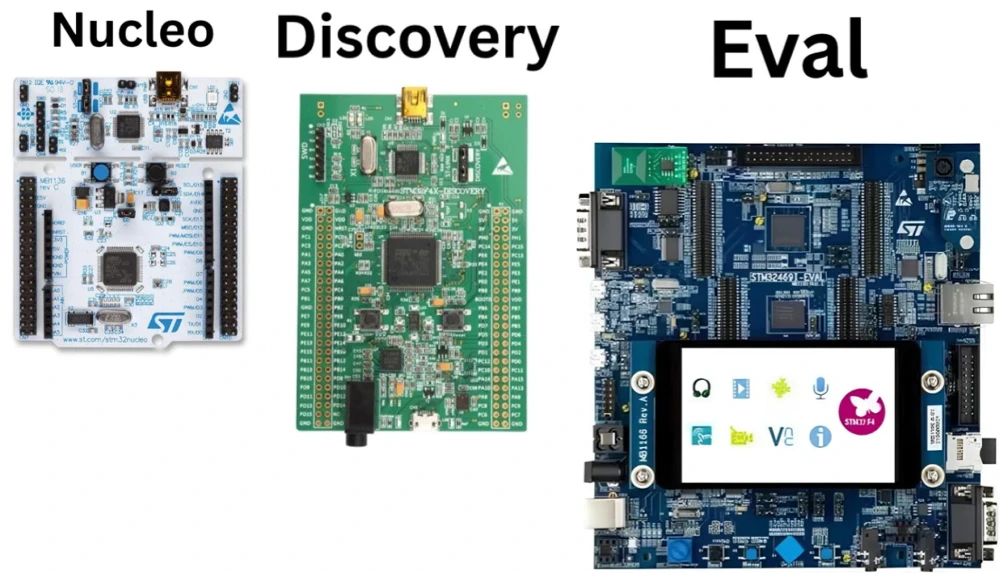
Table of contents
- STM32 Nucleo vs Discovery vs Custom Boards
- What Is an STM32 Development Board?
- STM32 Nucleo Boards Explained
- STM32 Discovery Boards Explained
- STM32 Evaluation Boards Explained
- Third-Party STM32 Development Boards
- What Are ST-LINK and SWD?
- Nucleo vs Discovery vs Evaluation Boards
- Working Example: Identifying the Important Components on a Nucleo Board
- When Should You Move to a Custom PCB?
- Wrapping up
What Is an STM32 Development Board?
An STM32 development board is a small printed circuit board that comes with an STM32 microcontroller already mounted on it, along with the supporting circuitry the chip requires to operate. This includes the power supply circuitry, a crystal oscillator for accurate timing, and typically an interface for connecting the board to a computer.
Most STM32 development boards also include a few additional components to support learning and testing. A user button and an LED are almost always present, allowing a first program to be tested without any additional wiring. Many boards also break out the microcontroller’s pins onto headers, allowing external sensors, motors, or displays to be connected later using jumper wires or a breadboard.
In effect, a development board provides the quickest route from wanting to evaluate STM32 to running code on actual hardware, without requiring any circuit design or soldering beforehand.
Why Use a Development Board?
A development board removes several problems that have nothing to do with actually learning STM32. You do not need to worry about designing a power supply circuit, choosing the right crystal, or figuring out decoupling capacitors before you can even blink an LED. All of that has already been done correctly by engineers at ST or a third-party manufacturer, and it has been tested on thousands of units before it reached you.
Development boards also come with a built-in or attached programmer and debugger, so you can connect the board to your computer with a single USB cable and immediately load code onto it. Without a board, you would need a separate programmer, the correct cables, and a fair bit of extra setup just to get your first program running.
There is also a practical cost argument here. A basic development board often costs less than buying the individual components separately, mainly because manufacturers produce these boards in very large quantities. So a development board is not just easier, it is frequently the cheaper option as well.
Once you understand the basics and your project is heading toward a real product, moving away from a development board and designing your own board starts to make sense. But that is a separate stage, and we will come back to it later in this article.
STM32 Nucleo Boards Explained
Nucleo boards are ST’s general-purpose and beginner-friendly development boards. They are usually the first recommendation anyone gives to someone new to STM32.
What makes Nucleo boards particularly beginner friendly is a feature called ST-LINK, which comes built directly onto the board itself. This means you do not need to buy a separate programmer at all. You plug in one USB cable, and that same cable both powers the board and lets you upload and debug your code. For someone buying their first STM32 board, this convenience matters more than it might seem at first.
Nucleo boards come in three physical sizes, and it helps to know the difference. Nucleo-32 boards are the smallest, with a compact form factor and fewer pins availablility. Nucleo-64 boards are the most common size, and they are usually the ones recommended in beginner tutorials, since they offer a good balance of size, pin access, and price. Nucleo-144 boards are the largest, offering the most pins and often supporting more advanced peripherals such as Ethernet, which makes them suitable for slightly more demanding projects.
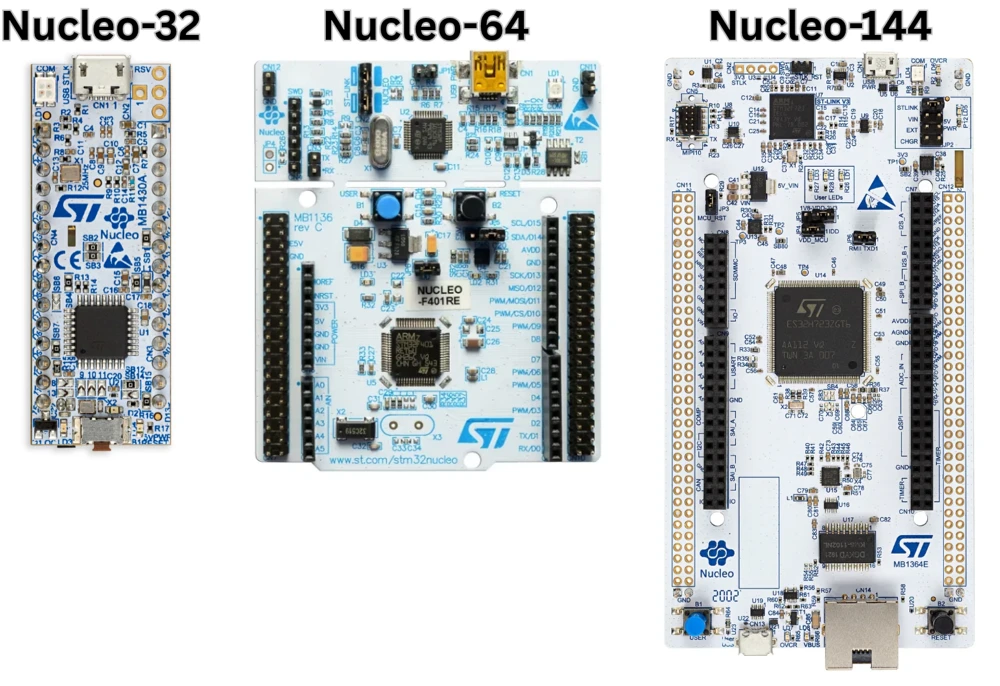
Nucleo boards also support something called Arduino-compatible headers on most models, particularly the Nucleo-64 and Nucleo-144 boards. This means you can plug many existing Arduino shields directly onto a Nucleo board, which can be a genuinely useful shortcut if you already own displays, motor drivers, or sensor shields from Arduino projects.
Because Nucleo boards are meant to be general-purpose, they usually keep extra components to a minimum. You get a user button, a reset button, an LED or two, and the ST-LINK programmer, along with the header pins for connecting your own components. This keeps the board affordable and keeps the focus on the microcontroller itself rather than on flashy extras.
If you are only going to buy one STM32 board while learning, a Nucleo-64 board built around an F4-series chip, such as the Nucleo-F401RE or Nucleo-F411RE, is a very safe and widely recommended starting point.
STM32 Discovery Boards Explained
Discovery boards take a different approach compared to Nucleo. Instead of being general-purpose learning boards, Discovery boards are built to show off what a specific STM32 family or a specific peripheral can actually do.
Because of this, Discovery boards usually include extra hardware that goes beyond a button and an LED. Depending on the specific board, you might find an onboard microphone, an accelerometer, a small LCD screen, audio output circuitry, or even a touchscreen display. All of this extra hardware is chosen specifically to demonstrate a feature of the STM32 chip it is built around.
For example, a Discovery board built around a chip with strong audio capabilities might include a digital microphone and an audio codec, so you can immediately test recording and playback without adding any external components. A Discovery board aimed at graphics-heavy STM32 chips often includes a color display right on the board, so you can see graphics rendering working the moment you power it on.
Discovery boards also include a built-in ST-LINK programmer, just like Nucleo boards, so getting started still only requires a single USB cable. However, Discovery boards generally offer fewer general-purpose header pins compared to Nucleo boards of a similar size, since a good part of the board’s space is used up by the demonstration hardware.
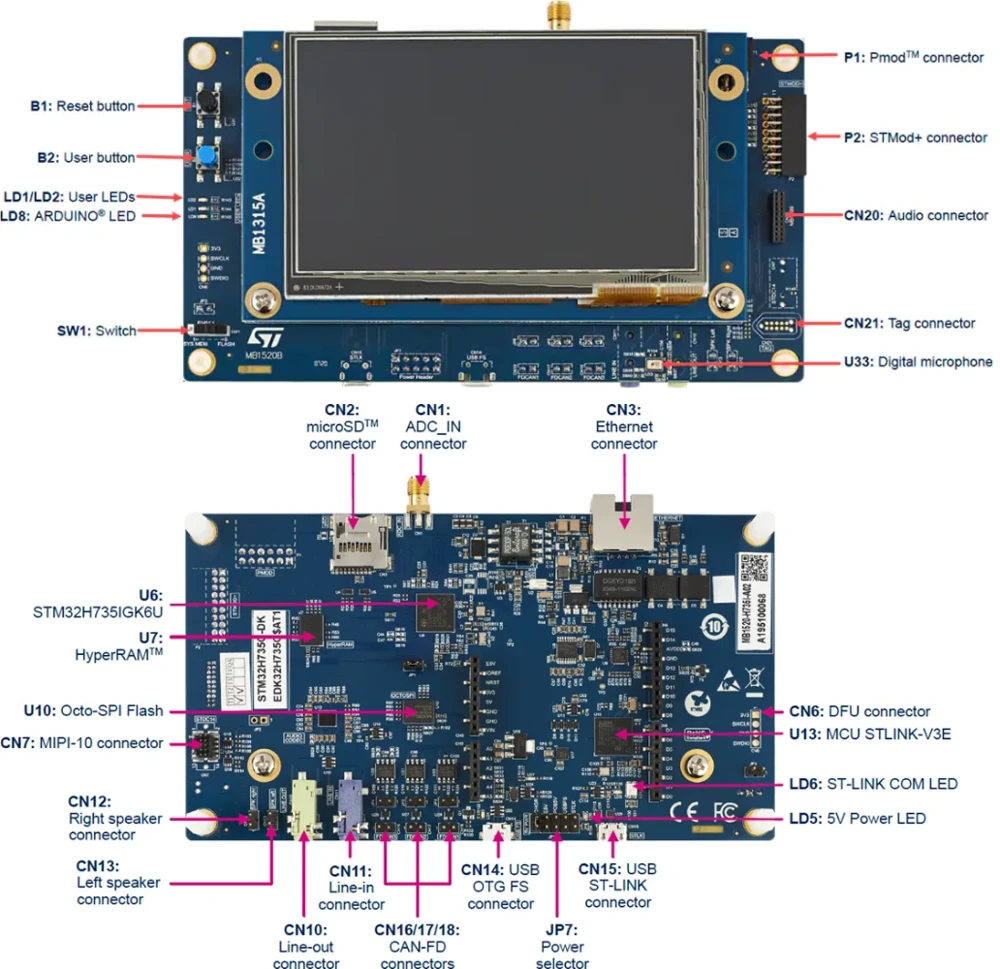
This makes Discovery boards a great choice once you already know which STM32 family you want to work with and want to explore its specific strengths. If you already know your project needs a touchscreen, or needs to process audio, a Discovery board built around a matching chip can save you a lot of time compared to wiring up all that hardware yourself on a Nucleo board.
STM32 Evaluation Boards Explained
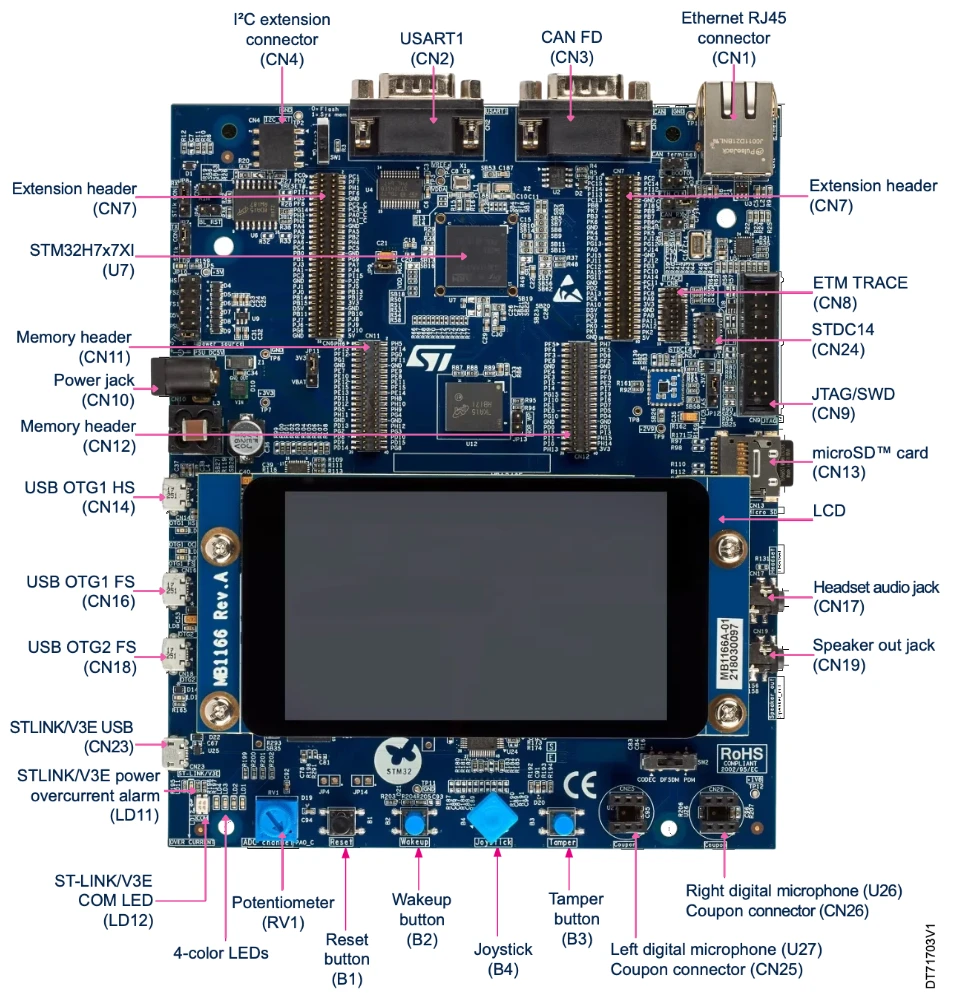
Evaluation boards, often written as “Eval boards,” sit at the top of ST’s official board lineup, and they are aimed less at hobbyists and more at engineers evaluating a chip for a real product.
The biggest difference with Evaluation boards is scope. While a Nucleo board keeps things simple and a Discovery board focuses on a specific set of features, an Evaluation board tries to expose almost everything the microcontroller is capable of. This often means multiple communication interfaces, several types of memory, connectors for cameras or displays, and sometimes even multiple power supply options so engineers can test how the chip behaves under different conditions.
Because of this wider scope, Evaluation boards are usually larger and noticeably more expensive than Nucleo or Discovery boards. They are designed for situations where a company is deciding whether a particular STM32 chip is the right one to use in an actual product, and they need to test as many real-world conditions as possible before committing to it.
For a beginner, an Evaluation board is rarely the right first purchase. The extra hardware and higher price do not add much value if you are still learning the basics of GPIO, timers, and communication protocols. Evaluation boards make far more sense later, once you already have a specific chip in mind for a product and need to test it thoroughly before designing your own board around it.
Third-Party STM32 Development Boards
Alongside ST’s own Nucleo, Discovery, and Evaluation boards, there is a large ecosystem of third-party boards built by other manufacturers using STM32 chips. The most well-known example is the “Blue Pill” board, built around an STM32F103 chip, which became extremely popular because of how inexpensive it was.
Third-party boards can be a reasonable option once you understand what you are getting into. They are often cheaper than official ST boards, and some of them are well designed and reliable. However, quality can vary a lot from one manufacturer to another. Some third-party boards have used counterfeit or re-labeled chips in the past, and documentation is sometimes limited or inaccurate compared to what ST provides for its own boards.
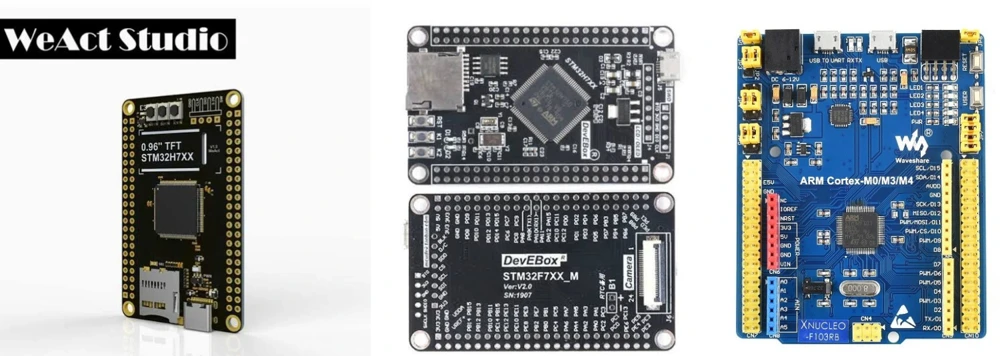
Another point worth knowing is that many third-party boards do not include a built-in ST-LINK programmer. Instead, they expose a set of programming pins and expect you to use a separate external programmer, which adds an extra step and an extra cost for a first-time buyer.
For someone just starting out, official ST boards remain the safer choice, mainly because of documentation quality, built-in programming and debugging support, and consistent hardware quality. Third-party boards become more interesting once you already have some experience and are looking for a cheaper option for a project you understand well, or when you want a board with a very specific form factor that ST does not officially offer.
What Are ST-LINK and SWD?
You will see the terms “ST-LINK” and “SWD” mentioned constantly around STM32 boards, so it is worth understanding exactly what they mean.
ST-LINK is ST’s own programmer and debugger hardware. Its job is to take the compiled program from your computer and load it onto the STM32 chip’s flash memory. It also lets your development software step through your code line by line while it is running on the actual hardware, so you can inspect variables and find bugs. On Nucleo and Discovery boards, a small section of the board is dedicated to ST-LINK circuitry, and this is exactly why a single USB cable is enough to both power the board and program it.
SWD, short for Serial Wire Debug, is the communication protocol that ST-LINK actually uses to talk to the STM32 chip. It uses just two signal wires, usually labeled SWDIO and SWCLK, along with power and ground. This is a deliberately simple interface, and it is one of the reasons STM32 debugging is so straightforward compared to older, more complicated debugging methods that needed many more connection wires.
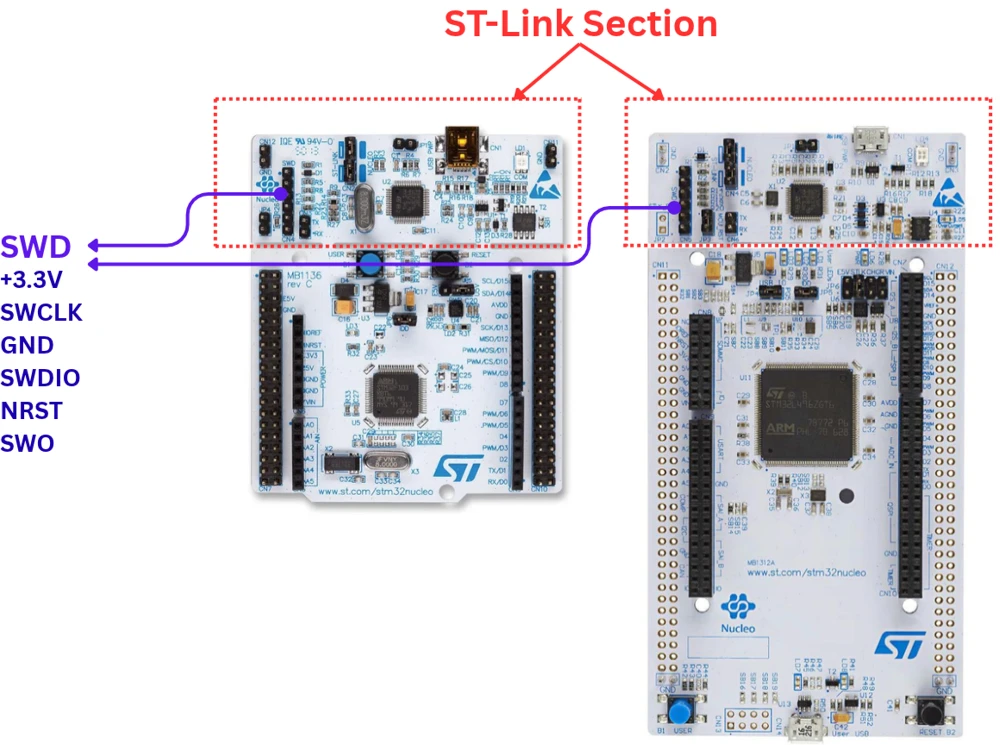
On a Nucleo or Discovery board, you never really need to think about SWD directly, since the onboard ST-LINK handles everything through the single USB connection. But once you move toward a custom-designed board of your own, you will need to include a small SWD header, so that an external ST-LINK programmer can connect to your custom board and load code onto it. Knowing this early makes that transition much less confusing when the time comes.
Nucleo vs Discovery vs Evaluation Boards
With all three board types explained individually, here is a simple side-by-side comparison to make the differences easier to remember.
| Aspect | Nucleo | Discovery | Evaluation |
|---|---|---|---|
| Main purpose | General-purpose learning and prototyping | Showcasing a specific family or feature | Thorough chip evaluation for products |
| Onboard extras | Minimal, button and LED | Displays, sensors, audio, or touch, depending on model | Extensive, multiple interfaces and memory types |
| Built-in ST-LINK | Yes | Yes | Sometimes, varies by board |
| Header pin access | High, including Arduino-style headers on many models | Moderate, reduced by onboard extras | High, but layout aimed at engineers, not hobbyists |
| Typical price | Low | Moderate | Higher |
| Best suited for | Beginners and general prototyping | Exploring a specific feature or chip family | Product-level chip evaluation |
If you are just getting started with STM32, a Nucleo board should almost always be your first purchase. Once you know which family or feature genuinely matters for your project, a matching Discovery board can be worth adding to your bench. Evaluation boards only become relevant once you are seriously considering a specific chip for a real product and need to test it thoroughly first.
Working Example: Identifying the Important Components on a Nucleo Board
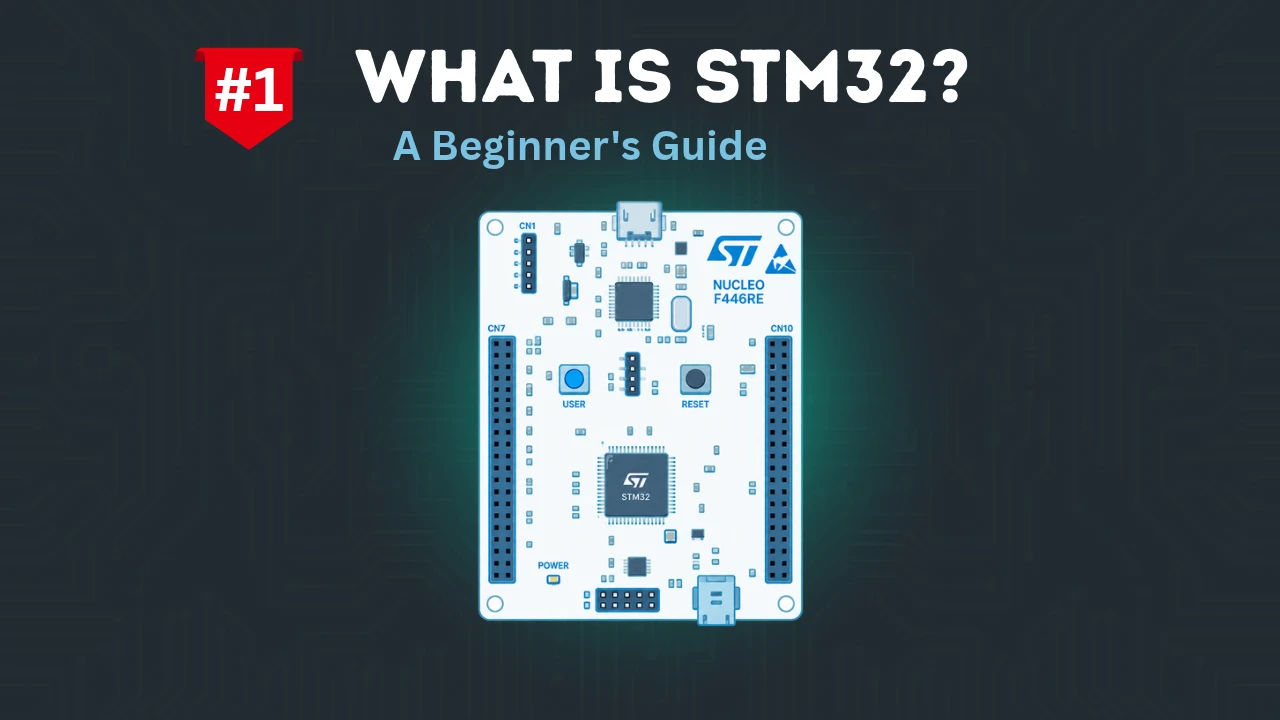
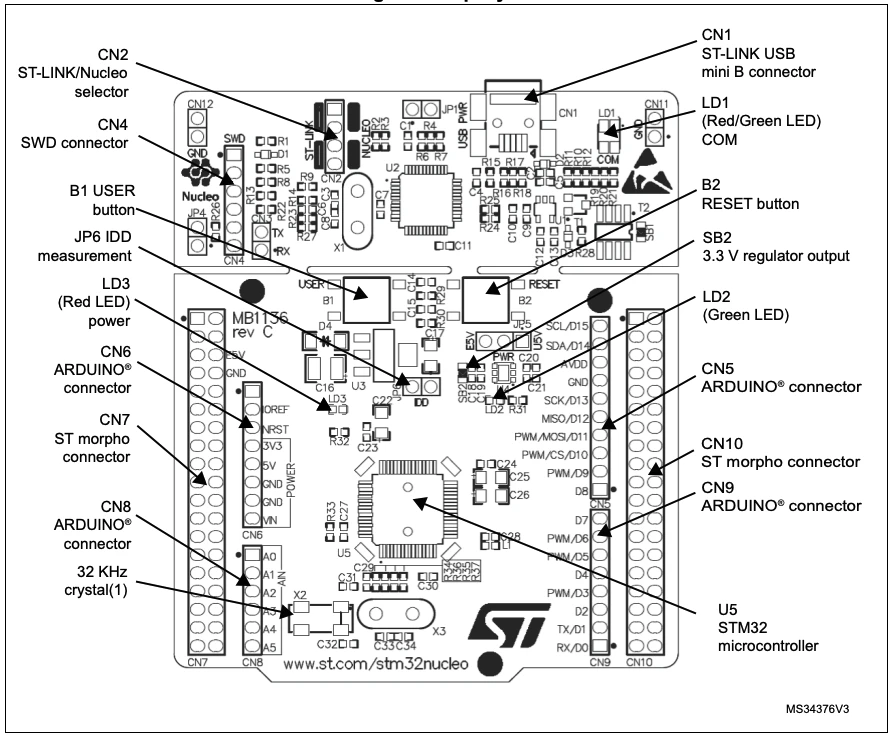
Since Nucleo boards are where most beginners start, it helps to know exactly what you are looking at the first time you buy one. A typical Nucleo-64 board, such as the Nucleo-F401RE, is made up of a few clearly separated sections.
The top portion of the board contains the ST-LINK section. This includes the USB connector you plug into your computer, a small set of status LEDs that indicate power and communication activity, and the ST-LINK microcontroller itself. A jumper block near this section, usually labeled with pins such as CN2, allows the ST-LINK section to be separated from the target board entirely, so the ST-LINK portion can even be used to program a completely different, external board if needed.
Below the ST-LINK section sits the target microcontroller, which is the actual STM32 chip your code will run on. Next to it, you will find a reset button, and a user button, which is already wired to a specific GPIO pin and is commonly used in beginner tutorials to trigger an action in code.
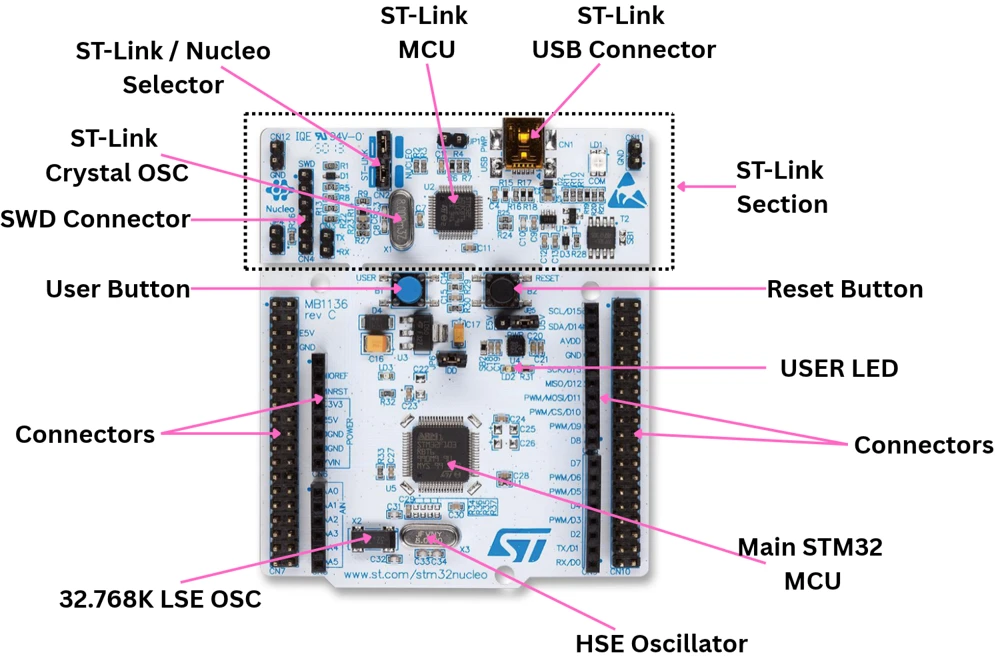
You will also spot a user LED, which is wired to another GPIO pin and is almost always the very first thing beginners learn to control, since blinking this LED is the traditional “hello world” of embedded programming.
Around the edges of the board, you will find two rows of header pins. These follow the Arduino Uno pin layout on most Nucleo-64 boards, while also breaking out every available STM32 pin through an additional set of headers. This dual layout is what allows Arduino shields to work directly, while still giving you full access to every pin the STM32 chip actually offers.
We cover the full blink LED workflow step-by-step in previous tutorial — here’s the short version applied to a Nucleo board.
We already covered the full blink LED workflow, from selecting your MCU in STM32CubeMX, to configuring the clock, setting up the GPIO pin, and flashing the board through STM32CubeIDE, in previous tutorial. The short version is this:
- Configure your chip in CubeMX
- Generate the project
- Write a couple of lines using HAL_GPIO_TogglePin() and HAL_Delay() inside the main loop
- Then build and flash it through CubeIDE.
That same configure, generate, write, build, flash, run cycle is what every larger STM32 project follows underneath, whether it is reading a sensor or driving a motor.
When Should You Move to a Custom PCB?
At some point, most STM32 projects that go beyond a hobby experiment start to outgrow their development board, and it is worth knowing what that point actually looks like.
The clearest signal is size and shape. If your project needs to fit inside a specific enclosure, a wearable device, or any product where a rectangular development board with header pins simply will not fit, that is a strong sign it is time to design your own board.
Cost at scale is another major factor. A development board is a reasonable one-time purchase, but if you are planning to build and sell even a few dozen units, paying for a full development board on every single unit becomes wasteful. A custom-designed board only includes the components your product actually needs, which usually brings the cost per unit down significantly.
Reliability and environment also matter. Development boards are built for lab and desk conditions. If your product needs to survive vibration, extreme temperatures, or needs specific certifications, a custom board designed and tested for those exact conditions becomes necessary.
Finally, once your project needs a very specific combination of components, a particular sensor, a specific connector, or a battery charging circuit laid out in a very particular way, fitting all of that around a development board’s fixed layout becomes more difficult than simply designing your own board from scratch.
None of this means you need to rush toward a custom PCB early. Development boards, especially Nucleo boards, remain genuinely useful even during early custom-hardware development, since you can prototype your firmware on a Nucleo board while your custom board design is still being finalized. The move to a custom PCB is a decision driven by your product’s real requirements, not a step you need to take just because you feel ready for it.
Wrapping up
Choosing between Nucleo, Discovery, and Evaluation boards stops feeling confusing once you know what each one is actually built for. Nucleo boards are the general-purpose, beginner-friendly option and are almost always the right first purchase. Discovery boards exist to showcase a specific STM32 family or feature, and they make sense once you already know what you are exploring. Evaluation boards are built for serious product-level chip testing and are rarely needed while you are still learning. Third-party boards can be worth considering later, once you understand the trade-offs involved in choosing them.
Along the way, we also looked at what ST-LINK and SWD actually do, and walked through the important components on a real Nucleo board, along with the path your code takes from your computer to the chip itself.
Now that you understand what these boards are called, the next step is understanding how ST names the chips that sit on them. In the next article, we will break down the STM32 naming convention in detail, so that a part number like STM32F401RET6 stops looking like a random string of letters and numbers.